
Once you determine the size of the points you want, you will need to cut (2) different strips of fabric twice as wide as your finished size plus a 1/4 " (seam allowance). For example:
2-1/2" points: cut (2) 5-1/4" wide strips
2" points: cut (2) 4-1/4" wide strips
1-1/2" points: cut (2) 3 -1/4" wide strips
1" points: cut (2) 2-1/4 " wide strips
 Continue across the entire length of your strip.
 Step 4:
Turn the strip around (for easier cutting).
The first cut will be 1/2 as deep as the cuts you have been making, and will be cut out completely. (In the example, 3" cuts have been made, so the first cut on this side will be made at 1-1/2".)
 Step 5:
The remaining cuts will be made at the same interval as before, across the entire length of the strip. (3" in the example.)
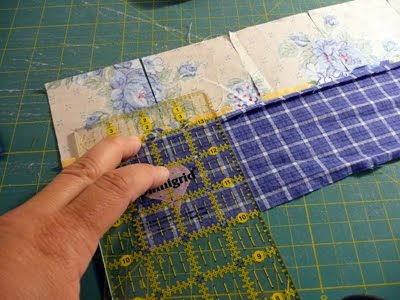 Step 6:
End the same way you started, by notching out the last 1/2 cut.
 Step 7:
Starting on one side, fold all of the points in half diagonally, and all in the SAME direction.

 Step 8:
Repeat the same process for folding the second side, being careful to continue folding in the SAME direction.
Note: if you are working with a really long strip you may want to fold both sides simultaneously working your way down the entire length.

 Step 9:
Now you are going to fold each triangle in 1/2 again.
Step 9:
Now you are going to fold each triangle in 1/2 again.
This time you will fold everything in the opposite direction as before.
 One side folded.
 Repeat for the second side.
Note: if you are working with a really long strip you may want to fold both sides simultaneously working your way down the entire length.

Both sides folded.
 Step 10:
Work your way down the entire length, folding it in half and pressing it with a hot iron.
 The points in the photo above have a "front row" and a "back row". If this is how you want them to look, then slip in a few pins to hold them in place as you go.
If you want your points to be nested one inside the next, then you will need to flip out the little tips as you go. Then add your pins. See photo below.
 Step 11:
Now all you need to do is take the whole thing over to your sewing machine and stay stitch along the entire length at 1/8".
 Ta-da!

1-1/2" points: cut (2) 3 -1/4" wide strips
1" points: cut (2) 2-1/4 " wide strips
The length will not vary, so cut as many wof (width of fabric), of each fabric, as you need and sew them all together end to end with a standard 1/4" seam allowance.
 Step 2:
Sew the strips together, lengthwise, with a standard 1/4" seam allowance.
Press the seam open.
 Step 3:
Place the strip wrong side up on your cutting board.
Using a ruler and rotary cutter, begin to make cuts across the length of your strip.
Each cut will go all the way to the seam line, exactly.
Each cut will be made at intervals equal to the width of your strips minus the seam allowance. (In the example, 3-1/4" strips were cut so each subsequent cut is made at 3" intervals.)
The example is cut for 1-1/2" points.
 Step 2:
Sew the strips together, lengthwise, with a standard 1/4" seam allowance.
Press the seam open.
 Step 3:
Place the strip wrong side up on your cutting board.
Using a ruler and rotary cutter, begin to make cuts across the length of your strip.
Each cut will go all the way to the seam line, exactly.
Each cut will be made at intervals equal to the width of your strips minus the seam allowance. (In the example, 3-1/4" strips were cut so each subsequent cut is made at 3" intervals.)
 Continue across the entire length of your strip.
 Step 4:
Turn the strip around (for easier cutting).
The first cut will be 1/2 as deep as the cuts you have been making, and will be cut out completely. (In the example, 3" cuts have been made, so the first cut on this side will be made at 1-1/2".)
 Step 5:
The remaining cuts will be made at the same interval as before, across the entire length of the strip. (3" in the example.)
 Step 6:
End the same way you started, by notching out the last 1/2 cut.
 Step 7:
Starting on one side, fold all of the points in half diagonally, and all in the SAME direction.

 Step 8:
Repeat the same process for folding the second side, being careful to continue folding in the SAME direction.
Note: if you are working with a really long strip you may want to fold both sides simultaneously working your way down the entire length.

 Step 9:
This time you will fold everything in the opposite direction as before.
 One side folded.
 Repeat for the second side.
Note: if you are working with a really long strip you may want to fold both sides simultaneously working your way down the entire length.

Both sides folded.
 Step 10:
Work your way down the entire length, folding it in half and pressing it with a hot iron.
 The points in the photo above have a "front row" and a "back row". If this is how you want them to look, then slip in a few pins to hold them in place as you go.
If you want your points to be nested one inside the next, then you will need to flip out the little tips as you go. Then add your pins. See photo below.
 Step 11:
Now all you need to do is take the whole thing over to your sewing machine and stay stitch along the entire length at 1/8".
 Ta-da!


