Showing posts with label Tutorials. Show all posts

Wednesday, August 14, 2013

School Supplies for Quilters

I am addicted to school supplies.
It's true.
Just ask my girls. They'll tell ya.
Paper, pencils, crayons, paper clips, folders, tape dispensers.............oh boy.

Now in years past, this was not an issue. We had students. They needed school supplies. I had my addiction. It worked.

But now........eh?
No one is all that excited to get fun school-y stuff from moi.

I've had to make a few changes.
Like just buy it all for myself.
Me. The quilter. It's so great!

You should definitely get in on this!
You can stock your studio for the whole year for $10 or less.
But you have to do it during the back-to-school sales-blitz in August.

Here are some of my favorite things:


1. Binder Paper. You can usually get this for 25 cents or less. Use it to print paper piecing templates. It is the same weight as the special paper piecing paper, but oh so much cheaper. And the lines on the paper really won't interfere with what your doing. (I have NEVER had a problem with it.)

2. Notebooks. These are great for jotting down your ideas (like those amazing middle of the night layouts that you can never quite remember after the sun comes up). And if you get the graph paper kind, they work great for drafting designs.

3.Post-It notes. These are good for.....well, everything. But I like to use them to make notes about patterns. I stick them right on the book pages, so that the next time I look at that particular pattern I will remember any mistakes in the pattern or tangents I might want to pursue, or notes for friends who might be borrowing my book.

4. Pens. You gotta have something to write all of this stuff down with.

5. Sharpies. These are a common item on workshop supply lists. Get them in regular and fine tip, just to cover your bases.

6. Colored pencils and a sharpener. These go with the graph paper. Use them for drafting ideas and designs.

7. Mechanical Pencils with extra lead. These are great for marking. I like to use them LIGHTLY when I am marking blocks for applique (especially back basting).

8. Glue sticks. Another common supply list item. You also need these for making mock-ups of blocks.

9. Paper scissors. Not only are they good for cutting paper (like applique templates) they are also good for travel. Blunt nosed ones will almost always make it through TSA. But if they don't, at least you only paid 50 cents for them!

10. Calculator. For calculating, of course.

11. Paint brushes. If you want to mod podge some cute fabric onto......well, anything.

12. Poster board. Use this to make yourself a portable design board. You'll be super glad you did. Tutorial HERE.

13. Crayons and coloring books/doodle pads. Use these to occupy any little people who might be hanging out in your sewing room. Or make something like this, this  or this to give as gifts.

14. Elmer's Glue. I have no idea why you need this, but I do know that every now and then it comes up and I can't find any. And I think to myself..."How is it that a girl with a school supply addiction doesn't have any Elmer's glue". So I am just sayin'...you might want to get some.

15. Friction Pens. These are great for marking fabric. They put down a nice bold line of ink that is easy to see. And when you are done with it, you just put a hot iron on it and it disappears. (It will reappear if the fabric gets really cold, but you can just iron it off again.)

Well, that is all I can think of right now, but if anything else comes to me I will add it to the list.
Happy shopping.

Update on the uses of Elmer's glue: quilters who dye their own fabrics use it as a resist when creating dye patterns.

Monday, October 22, 2012

Mini Design Boards


These little design boards are so fabulous!

I don't know about you, but I have a bad habit of mixing up pieces when I move them from my design wall or my cutting table over to my sewing machine. Even when I think that I have everything all in order, things can still turn out jumbled. So annoying!

But these little boards have pretty much eliminated my problem.

How do they work, you ask?

Well, when you are cutting out your quilt block (at your cutting table on the opposite side of the sewing room as your machine) you simply lay the block out on the board as you go. You spend all the time you want fussing and arranging colors and values and whatever else you might fuss about. Then, when you have it just so, you simply pick up the entire thing and walk over to your machine and sew it. No re-ordering or re-arranging or trying to remember anything. Just simple, accurate piecing.

I love these boards!

If you want to make one (or two or ten) for yourself (and all of your friends), check out a bee in my bonnet's tutorial here.

Psst...Christmas is just around the corner.

Wednesday, June 15, 2011

Continuous Prairie Points

My little friendship circle of quilters is just about to wrap up another "progressive" quilt making adventure. If you are not familiar with progressives (also known as "round-robins") then stay tuned because I will be sharing ours with you soon. Like next month! Because the big reveal is coming!!

But in the meantime, I wanted to post a little tutorial on how to make continuous prairie points since one of the required elements for this year's progressive was to add prairie points to every quilt.

Firstly, you need to determine how big you want your points to be, and whether or not you want them all made from the same fabric. Once you know that, click on the links below to find the appropriate tutorial.

1- Points made with a single fabric.
2- Points made with 2 fabrics.
3- Points made with many fabrics.

I hope they are SUPER helpful!

PS: Sorry about the extra-ugly ironing board cover! I am going to do something about that real soon. Really. I am. Soon.

Prairie Points: One Fabric

Step 1: Cutting
Once you determine the size of the points you want, you will need to cut your fabric 4x wider than that. For example:
2-1/2" points: cut a 10" width
2" points: cut an 8" width
1-1/2" points: cut a 6" width
1" points: cut a 4 " width

The length will not vary, so cut as many wof (width of fabric) as you need and sew them all together with a standard 1/4" seam allowance.

The example is cut for 2" points.
Step 2:
Fold the strip in half, wrong sides together, and press to mark the fold.

Step 3:
Open the strip back up, and place it wrong side up on your cutting board.
Using a ruler and rotary cutter, begin to make cuts across the length of your strip.
Each cut will go all the way to the fold, exactly.
Each cut will be made at intervals equal to 1/2 of the width. (In the example, an 8" strip was cut so each subsequent cut is made at 4" intervals.)


Continue across the entire length of your strip.

Step 4:
Turn the strip around (for easier cutting).
The first cut will be 1/2 as deep as the cuts you have been making, and will be cut out completely. (In the example, 4" cuts have been made, so the first cut on this side will be made at 2".)

Step 5:
The remaining cuts will be made at the same interval as before, across the entire length of the strip. (4" in the example.)

Step 6:
End the same way you started, by notching out the last 1/2 cut.

Step 7:
Starting on one side, fold all of the points in half diagonally, and all in the SAME direction.


Step 8:
Repeat the same process for folding the second side, being careful to continue folding in the SAME direction.
Note: if you are working with a really long strip you may want to fold both sides simultaneously working your way down the entire length.


Step 9:
Now you are going to fold each triangle in 1/2 again.
This time you will fold everything in the opposite direction as before.

One side folded.

Repeat for the second side.
Note: if you are working with a really long strip you may want to fold both sides simultaneously working your way down the entire length.


Both sides folded.

Step 10:
Work your way down the entire length, folding it in half and pressing it with a hot iron.

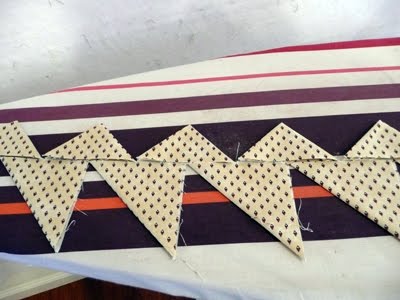
The points in the photo above have a "front row" and a "back row". If this is how you want them to look, then slip in a few pins to hold them in place as you go.

If you want your points to be nested one inside the next, then you will need to flip out the little tips as you go. Then add your pins. See photo below.

Step 11:
Now all you need to do is take the whole thing over to your sewing machine and stay stitch along the entire length at 1/8".

Ta-da!
 

Now how about making prairie points with two different fabrics?  Click here for the tutorial.

Or lots of different fabrics??  Click here for the tutorial.

Prairie Points: Two Fabrics

Step 1: Cutting
Once you determine the size of the points you want, you will need to cut (2) different strips of fabric twice as wide as your finished size plus a 1/4 " (seam allowance). For example:
2-1/2" points: cut (2) 5-1/4" wide strips
2" points: cut (2) 4-1/4" wide strips
1-1/2" points: cut (2) 3 -1/4" wide strips
1" points: cut (2) 2-1/4 " wide strips

The length will not vary, so cut as many wof (width of fabric), of each fabric, as you need and sew them all together end to end with a standard 1/4" seam allowance.

The example is cut for 1-1/2" points.
Step 2:
Sew the strips together, lengthwise, with a standard 1/4" seam allowance.
Press the seam open.

Step 3:
Place the strip wrong side up on your cutting board.
Using a ruler and rotary cutter, begin to make cuts across the length of your strip.
Each cut will go all the way to the seam line, exactly.
Each cut will be made at intervals equal to the width of your strips minus the seam allowance. (In the example, 3-1/4" strips were cut so each subsequent cut is made at 3" intervals.)

Continue across the entire length of your strip.

Step 4:
Turn the strip around (for easier cutting).
The first cut will be 1/2 as deep as the cuts you have been making, and will be cut out completely. (In the example, 3" cuts have been made, so the first cut on this side will be made at 1-1/2".)

Step 5:
The remaining cuts will be made at the same interval as before, across the entire length of the strip. (3" in the example.)

Step 6:
End the same way you started, by notching out the last 1/2 cut.

Step 7:
Starting on one side, fold all of the points in half diagonally, and all in the SAME direction.

Step 8:
Repeat the same process for folding the second side, being careful to continue folding in the SAME direction.
Note: if you are working with a really long strip you may want to fold both sides simultaneously working your way down the entire length.


Step 9:
Now you are going to fold each triangle in 1/2 again.
This time you will fold everything in the opposite direction as before.

One side folded.

Repeat for the second side.
Note: if you are working with a really long strip you may want to fold both sides simultaneously working your way down the entire length.


Both sides folded.

Step 10:
Work your way down the entire length, folding it in half and pressing it with a hot iron.

The points in the photo above have a "front row" and a "back row". If this is how you want them to look, then slip in a few pins to hold them in place as you go.

If you want your points to be nested one inside the next, then you will need to flip out the little tips as you go. Then add your pins. See photo below.

Step 11:
Now all you need to do is take the whole thing over to your sewing machine and stay stitch along the entire length at 1/8".

Ta-da!

Prairie Points: Many fabrics

One of the trickiest things about making individual prairie points (I think!) is getting them all lined up and evenly tucked into each other. This method totally solves that problem!

Step 1: Cutting
Once you determine the size of the points you want, you will need to cut many different rectangles of fabric twice as wide as your finished size (x) twice as wide as your finished size plus a 1/4 " (seam allowance). For example:
2-1/2" points: cut 5" x 5-1/4" blocks
2" points: cut 4" x 4-1/4" blocks
1-1/2" points: cut 3" x 3 -1/4" blocks
1" points: cut 2" x 2-1/4 " blocks

You can estimate your length or just cut a pile of blocks and see how far they go. Then add more as needed.

The example is cut for 1" points.
Step 2:
Sew the blocks together with a standard 1/4" seam allowance.
Align the top edges (the seam allowance edge) and off-set the blocks by 1/2. See photo below.

Add in the next block by slipping it in to just touch the other bottom block, and aligning the top edges.

Add the next block on the top by slipping it in to just touch the edge of the other top block.

And so on...

And so on...

Until you have a whole long string of them.

Step 3:
Press the seam open.

Note: As you can see, you will not need to cross cut these. You have already done the cutting!

Step 4:
Starting on one side, fold all of the points in half diagonally, and all in the SAME direction.


Step 8:
Repeat the same process for folding the second side, being careful to continue folding in the SAME direction.
Note: if you are working with a really long strip you may want to fold both sides simultaneously working your way down the entire length


Step 9:
Now you are going to fold each triangle in 1/2 again.
This time you will fold everything in the opposite direction as before.

One side folded.

Repeat for the second side.
Note: if you are working with a really long strip you may want to fold both sides simultaneously working your way down the entire length.


Both sides folded.

Step 10:
Work your way down the entire length, folding it in half and pressing it with a hot iron.


The points in the photo above have a "front row" and a "back row". If this is how you want them to look, then slip in a few pins to hold them in place as you go.


If you want your points to be nested one inside the next, then you will need to flip out the little tips as you go. Then add your pins. See photo below.


Step 11:
Now all you need to do is take the whole thing over to your sewing machine and stay stitch along the entire length at 1/8".

Ta-da!